
As long as the user and the bot have interacted in Facebook Messenger or LINE OA (the user has typed or pressed a button), whenever there is new information to be sent to the user, the trainer can use the “Broadcasts” function to actively push messages and interact with the user again.
If you have set tags in advance and are a paid PRO user, you can select a specific tag group as a target for Broadcasts; you can even filter according to the First Interaction, the Last Interaction, the Last Broadcast Time, Not Recently Broadcast, and Account binding status as a target for Broadcasts. That way, you can accurately re-market and reduce the blocking rate of users
1. Add Broadcast
Click “Broadcasts” in the left field menu, click “+ New Broadcast,” or add by clicking the blue or green “Here.”

2. Select Channel
Select the channel for Broadcast; you can select multiple fan pages or LINE official accounts!

【BotBonnie’s Note】If there is no number displayed in the “Number of Recipients” in the preview at the bottom, a 🔄 symbol will appear. This may mean that you do not have administrator permissions for your fan page!
3. Filter user segments
There are varous types of rules that you can filter user segments, just click “+Add Rule” to filter users to push.

【BotBonnie’s Note】
1. If you want to send it to all users who have interacted with the bot, you don’t need to filter the target!
2. Free “Starter” users cannot perform Segmented Broadcasts. Only paid “PRO” users can filter users to Broadcast based on certain Conditions.
3-1. Filter by “User Tags”
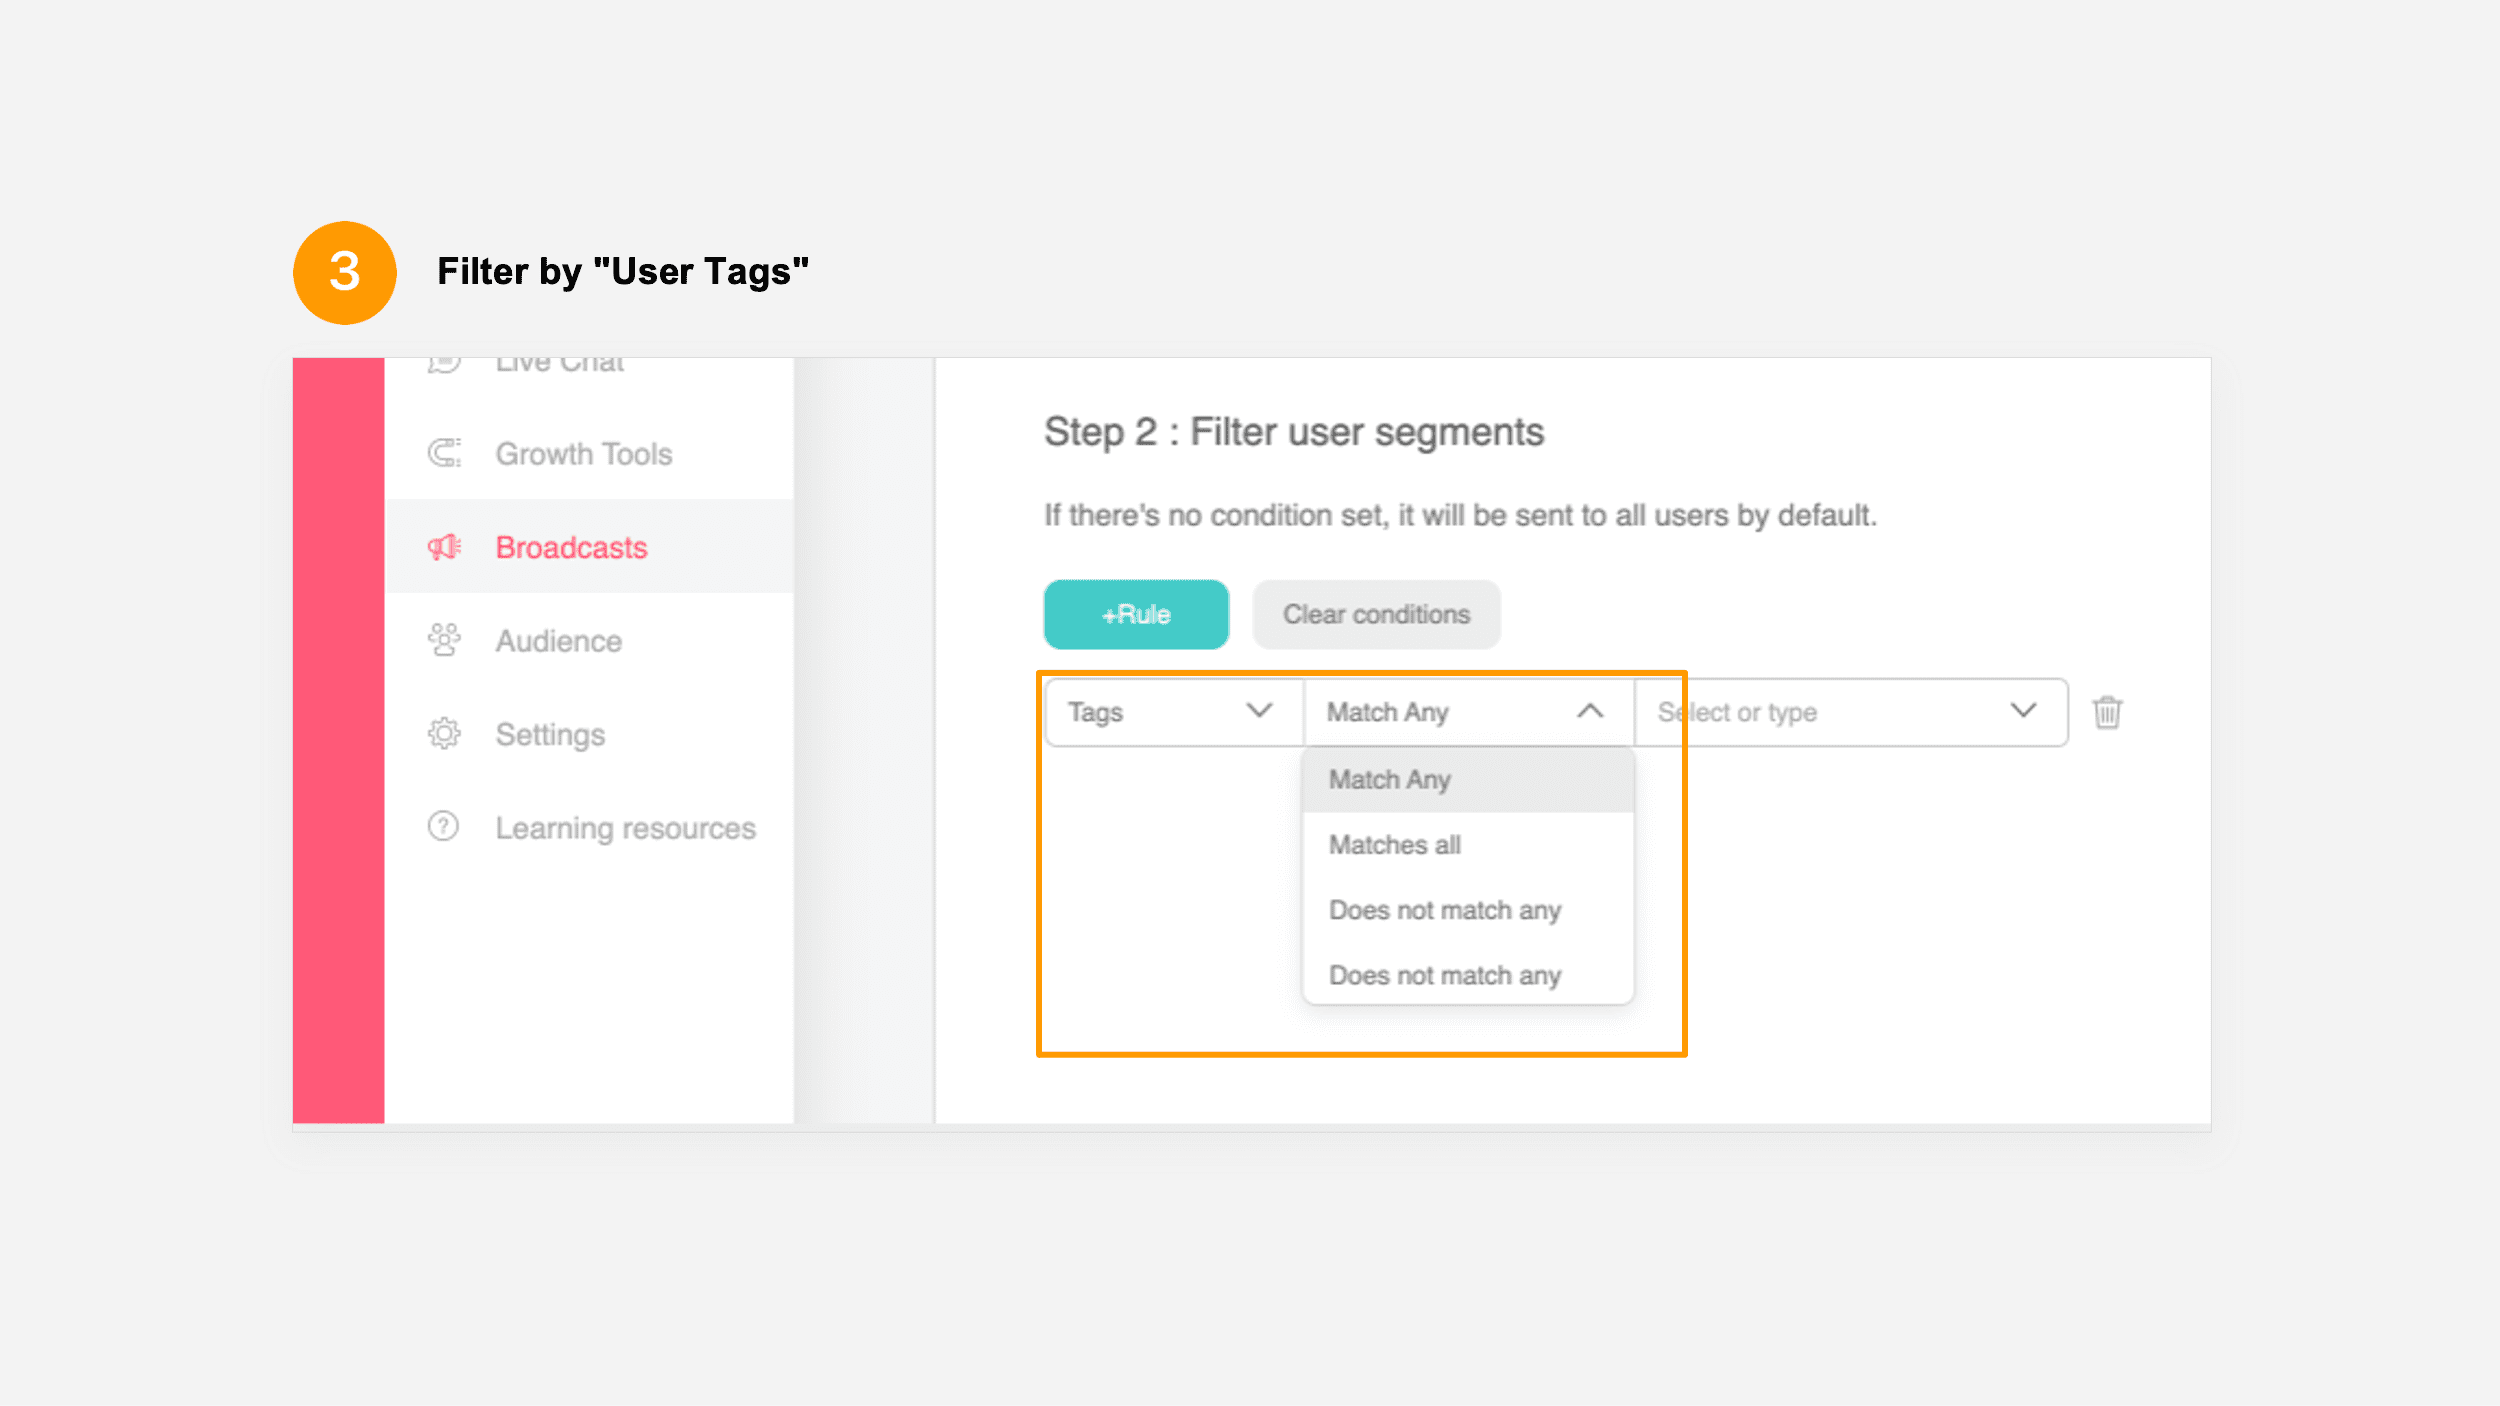
In the second drop down menu, you can see the filter conditions “Match Any,” “Match All,” “Does not Match Any” and “Does not Match All.” You can perform detailed filtering according to the user tags selected in the third drop down menu.

3-2. Filter by “User Tag Confidence Index”
Each company and business has its own indicators for “being tagged more than a few times” and “when is it tagged.” Therefore, BotBonnie has put together a Tag confidence index and provides unified standards for users’ reference.

【BotBonnie’s Tip】👉👉 Learn how to use the “User Tag Confidence Index”!
You can also filter by number of tags and time of tagging according to the requirements per scenario. The following will introduce the two filter classifications.
3-3. Filter by “Number of User Tags”
You can directly filter by frequency of specified tags you want to push! If you have a “purchase” tag and want to recommend new discounted products or offers to the groups that buy most often, you can use the “number of user tags” to filter a list of the core users you want!

3-4. Filter by “User Tag Date”
You can use the “tag date” to find the most active users who have been tagged with the specified tag! If you want to push information to the users who have been tagged “click 1212 hot sales ” by 2020.12.10 and share the latest information, you can use the “tag date” function! Just set the tagging time to “before” 2020.12.10 to filter.
In addition, if you use the same tags for separate activities and you want to push the “intent to purchase” tag for event B, you can also filter using the “tag date”! Assuming that event B is held on 2021/04/05 and event A is held on 2021/04/04, you can set “after” 2021/04/05, which means that the filter will “include” the users tagged on 4/5. Just like that, you can filter users who have the B event tag!

3-5. Filter by “First Interaction”
The conditions “Before” and “After” can be set to filter the target of the push according to the time the user interacted with the chatbot for the first time.

3-6. Filter by “Last Interaction”
The conditions “Before” and “After” can be set to filter the target of the push according to the time of the user’s last interaction with the chatbot.

3-7. Filter by “Account Binding Status”

You can set the conditions “Connected” and “Unbound” to filter push targets according to the binding status of the user account.。
【BotBonnie’s Tip】Account Binding kit tutorial
3-8. Filter by “User Menu Group”

【BotBonnie’s Tip】Menu management tutorial and applications
3-9. Filter by “One-time Notification List”
Starting in 2020, brands can send “one-time notification request” messages through Messenger and also perform more accurate marketing operations through push broadcasts on the Audience members who click the “Notify Me” button.
【BotBonnie’s Tip】Learn about One-time Notification settings
If you select one-time notification request in the script module and use the Add Tag action. After the user clicks “Notify Me,” the default notification menu will be added and the marketing schedule tag will also be added.

By using “One-Time Notification List” and “User Tags,” you can push messages to users who have participated in marketing campaigns!

3-10. Filter by “Not Recently Broadcast”
You can select “Not Broadcast in the Last 1-60 Days” as the push filter criteria to avoid pushing too frequently to the same user, which can result in a bad user impression.

3-11. Filter by “Birthday Month”
You can select “January-December” as the push filter criteria to send the specific information for same month.

Multiple Condition Filter
In addition to setting a single condition to filter and push, you can also set multiple conditions to filter. Use “and” or “or” conditions to push message to users.
After selecting the target of the message, click “Next” to schedule the message to be sent!

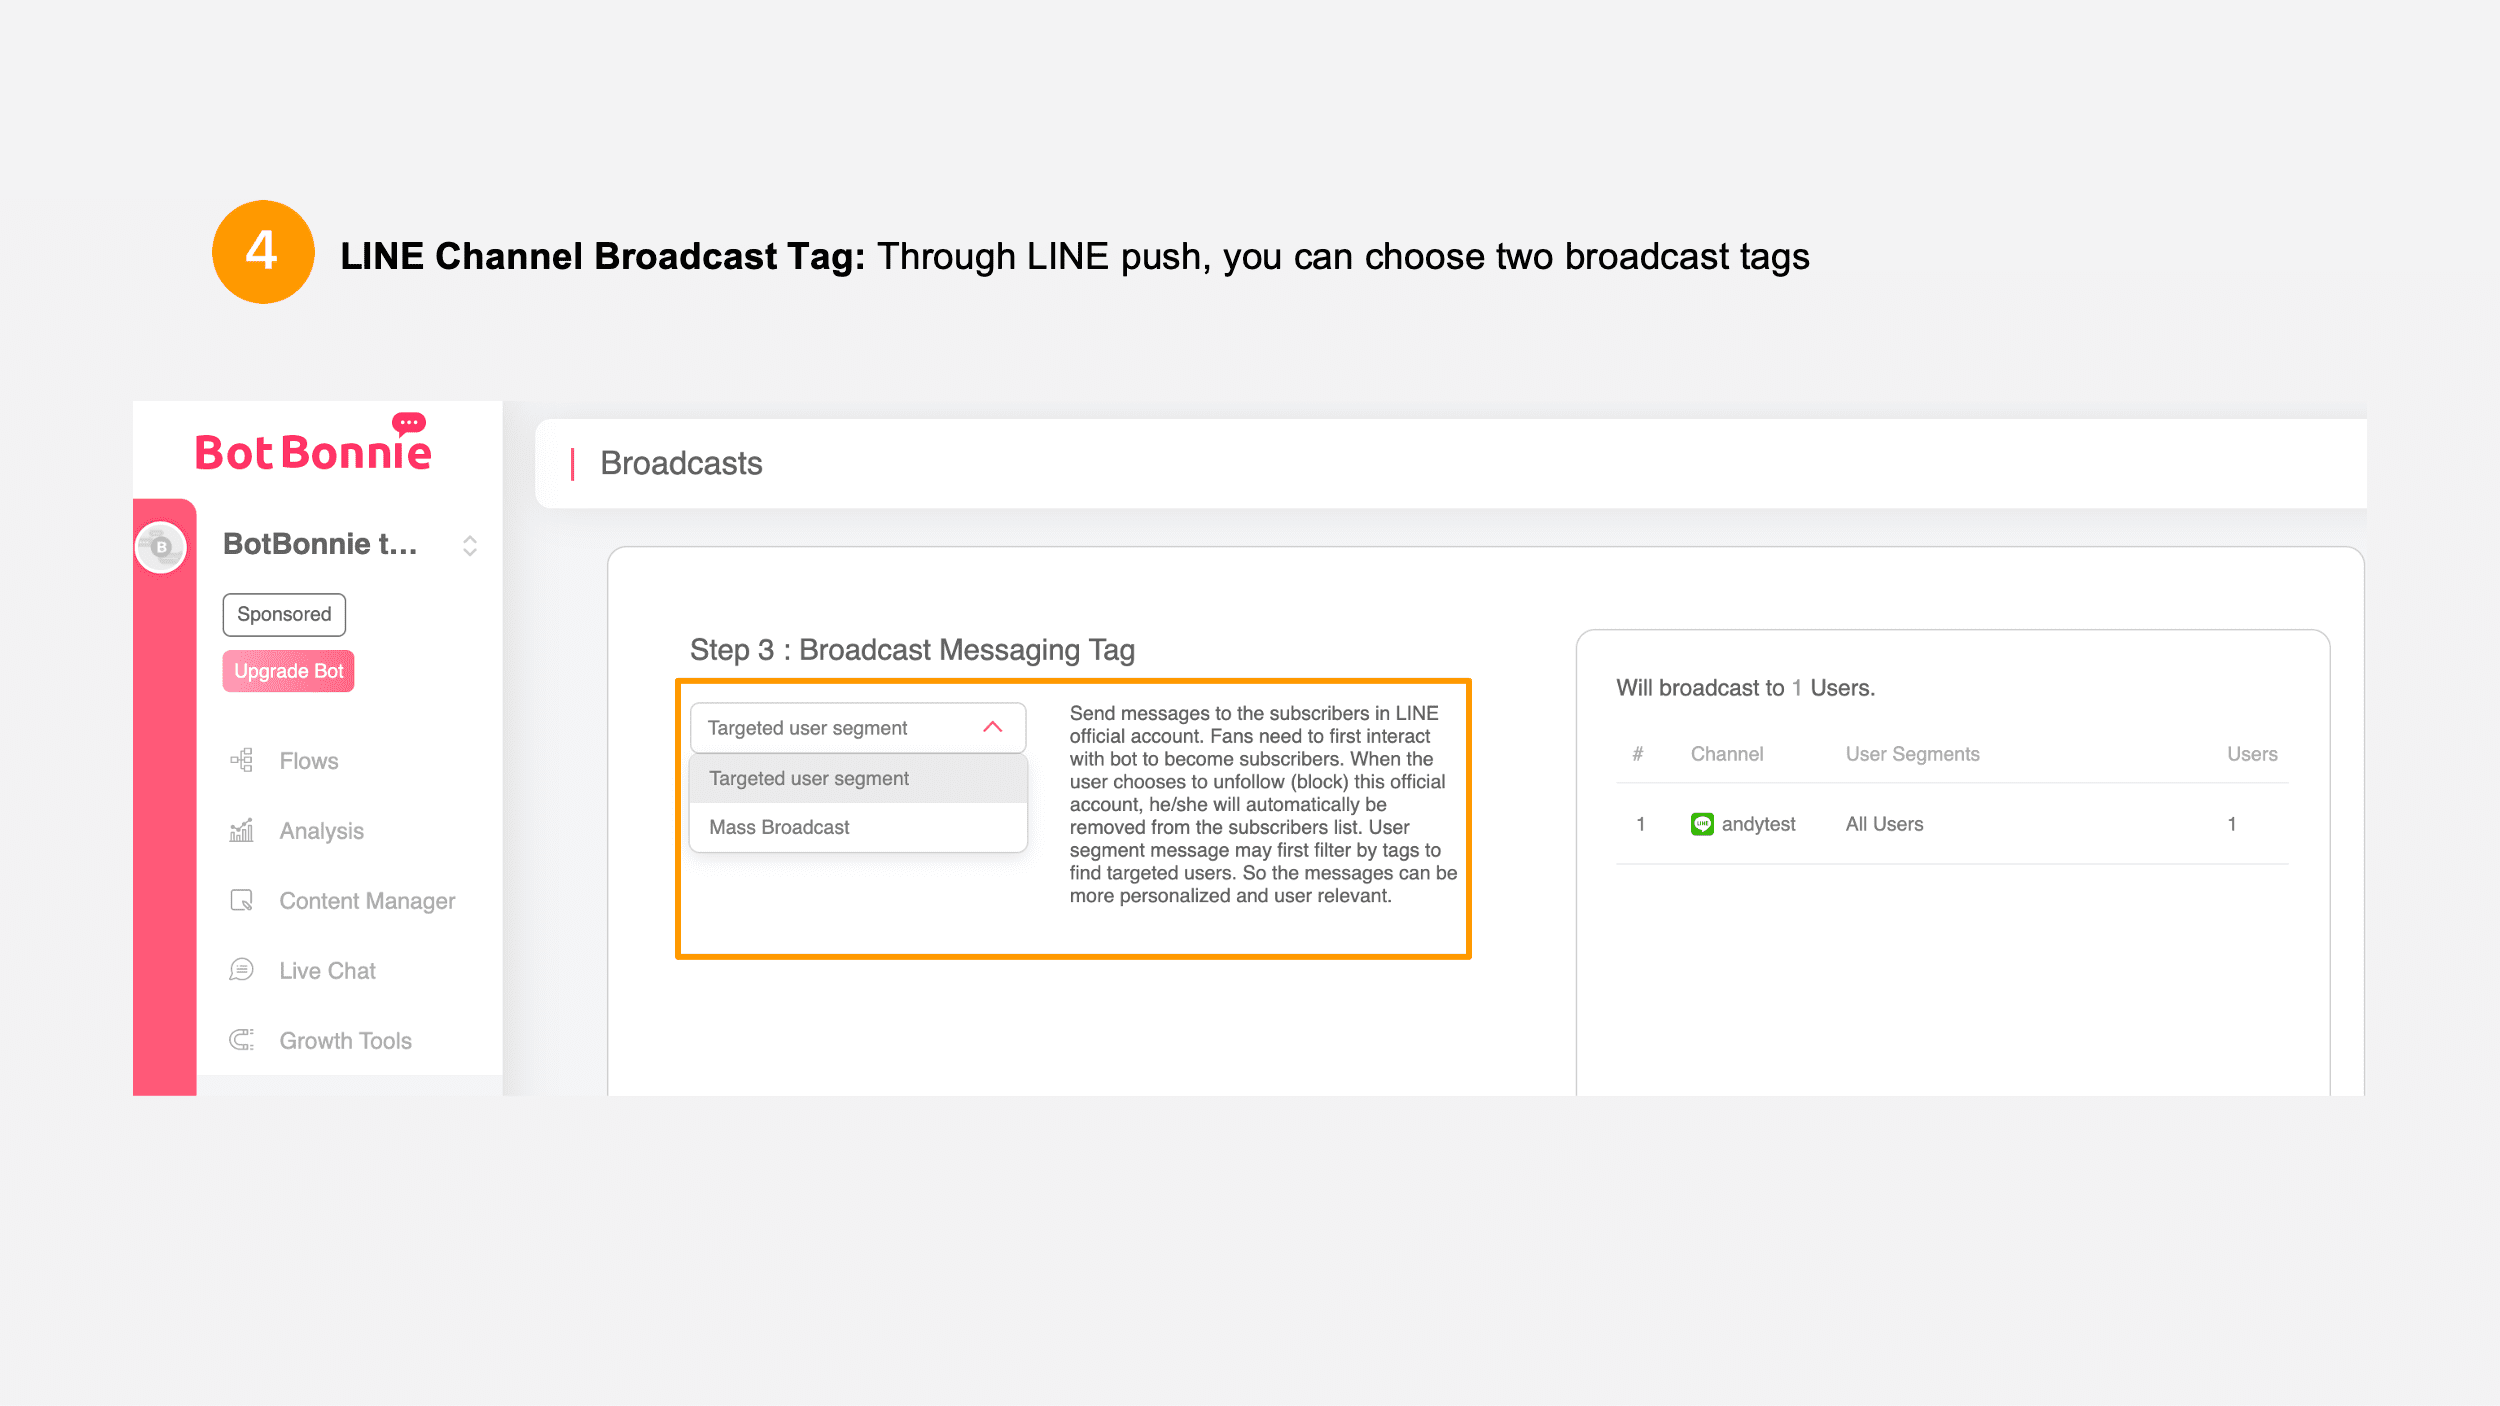
4. Choose broadcast tag and time
Choose Facebook as the channel
Broadcast tag:
Select a message tag. When “any type” is selected, the message tag definition and notes will be displayed in the blank space on the right:
1. Confirmed Event Update: Can be delivered to users at any time, avoiding the limitations of the 24-hr policy. The content of the message may include reminders, confirmations, and status updates confirming participation (e.g., already purchased tickets for the itinerary). Applicable to both upcoming and ongoing events.
2. Post Purchase Update: Can be delivered to users at any time, avoiding the limitations of the 24-hr policy. The content of the message may include user updates on recent purchases, such as transaction details and shipment status notifications.
3. Account Update: Can be delivered to users at any time, avoiding the limitations of the 24-hr policy. The content of the message may include recipients of notification messages whose account settings have been changed. Example: Personal files have been changed, preferences have been updated, settings have been changed, membership has ended, or passwords have been changed.
4. Non-promotional Subscription Messages: According to the subscription messaging policy of the messenger platform, non-promotional messages in the categories of news, productivity, or personal tracking are sent. You can apply for this tag under “Fan Page Settings”> “Messenger Platform.”
5. Standard messages: Messages (ads included) can only be successfully delivered to users who have interacted with you within the past 24 hours.
【BotBonnie’s Tip】Don’t miss this! New Facebook Messenger platform policy for 2020
If you have not applied for “Non-promotional Subscription Messages” permissions, a warning will appear in the preview on the right.

【BotBonnie’s Tip】Facebook has stipulated that “subscription messages” must not contain promotional content. See an example here >>
Choose LINE as the channel
Broadcast tag:
1. Targeted user segment: If there was filtering of specific users in the previous step, a message will be broadcast to user groups with specific Conditions who have interacted with the chatbot. If there was no filtering of specific users in the previous step, a message will be broadcast to all subscribers who have interacted with the chatbot.
2. Mass Broadcast: A message will be broadcast to all unblocked friends of the official account.
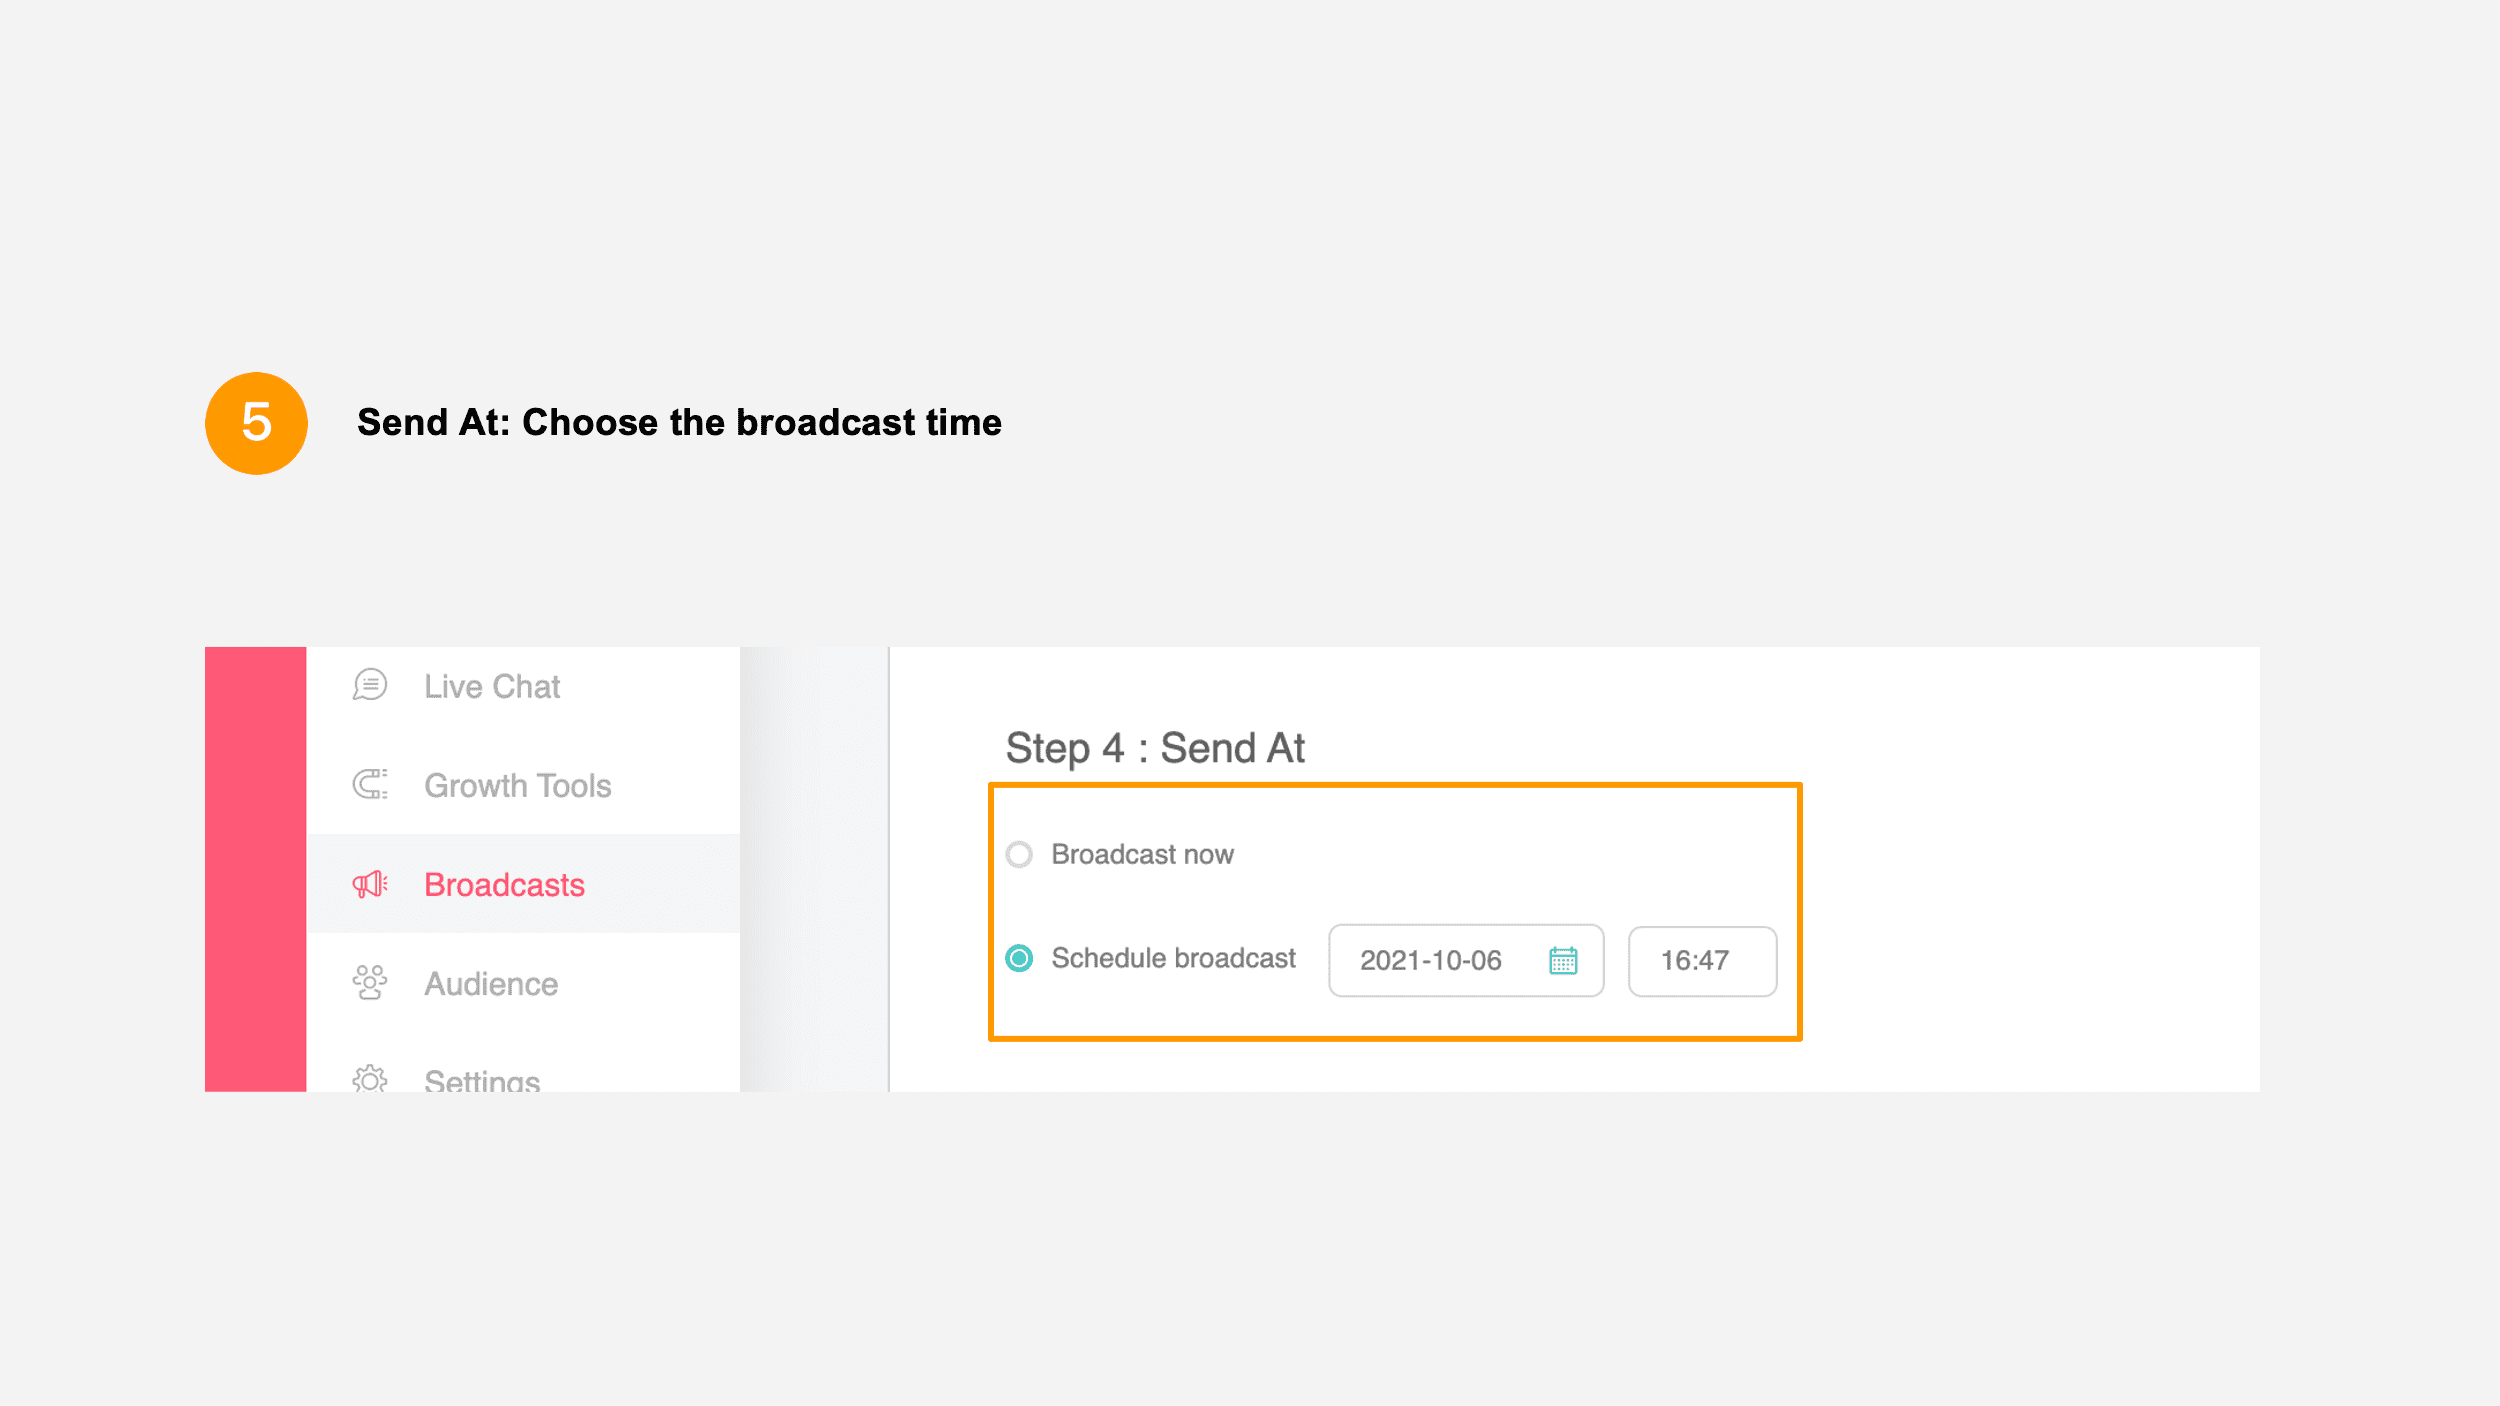
5. Send At
You can choose whether to Send Now or to broadcast it at a later time. When you select “Schedule Broadcast,” avoid changing the content of the message within half an hour before the broadcast time to prevent the broadcast from failing.
6. Edit message content
Select the module you want to push (the drop down menu will only display modules that have been pushed previously), or click “+Add Module” to create a new message. Click “Test Module” in the lower right corner of the screen to open the messenger and view the content of the message. After confirming both content and time, click “Broadcast Module/Schedule” to complete settings.

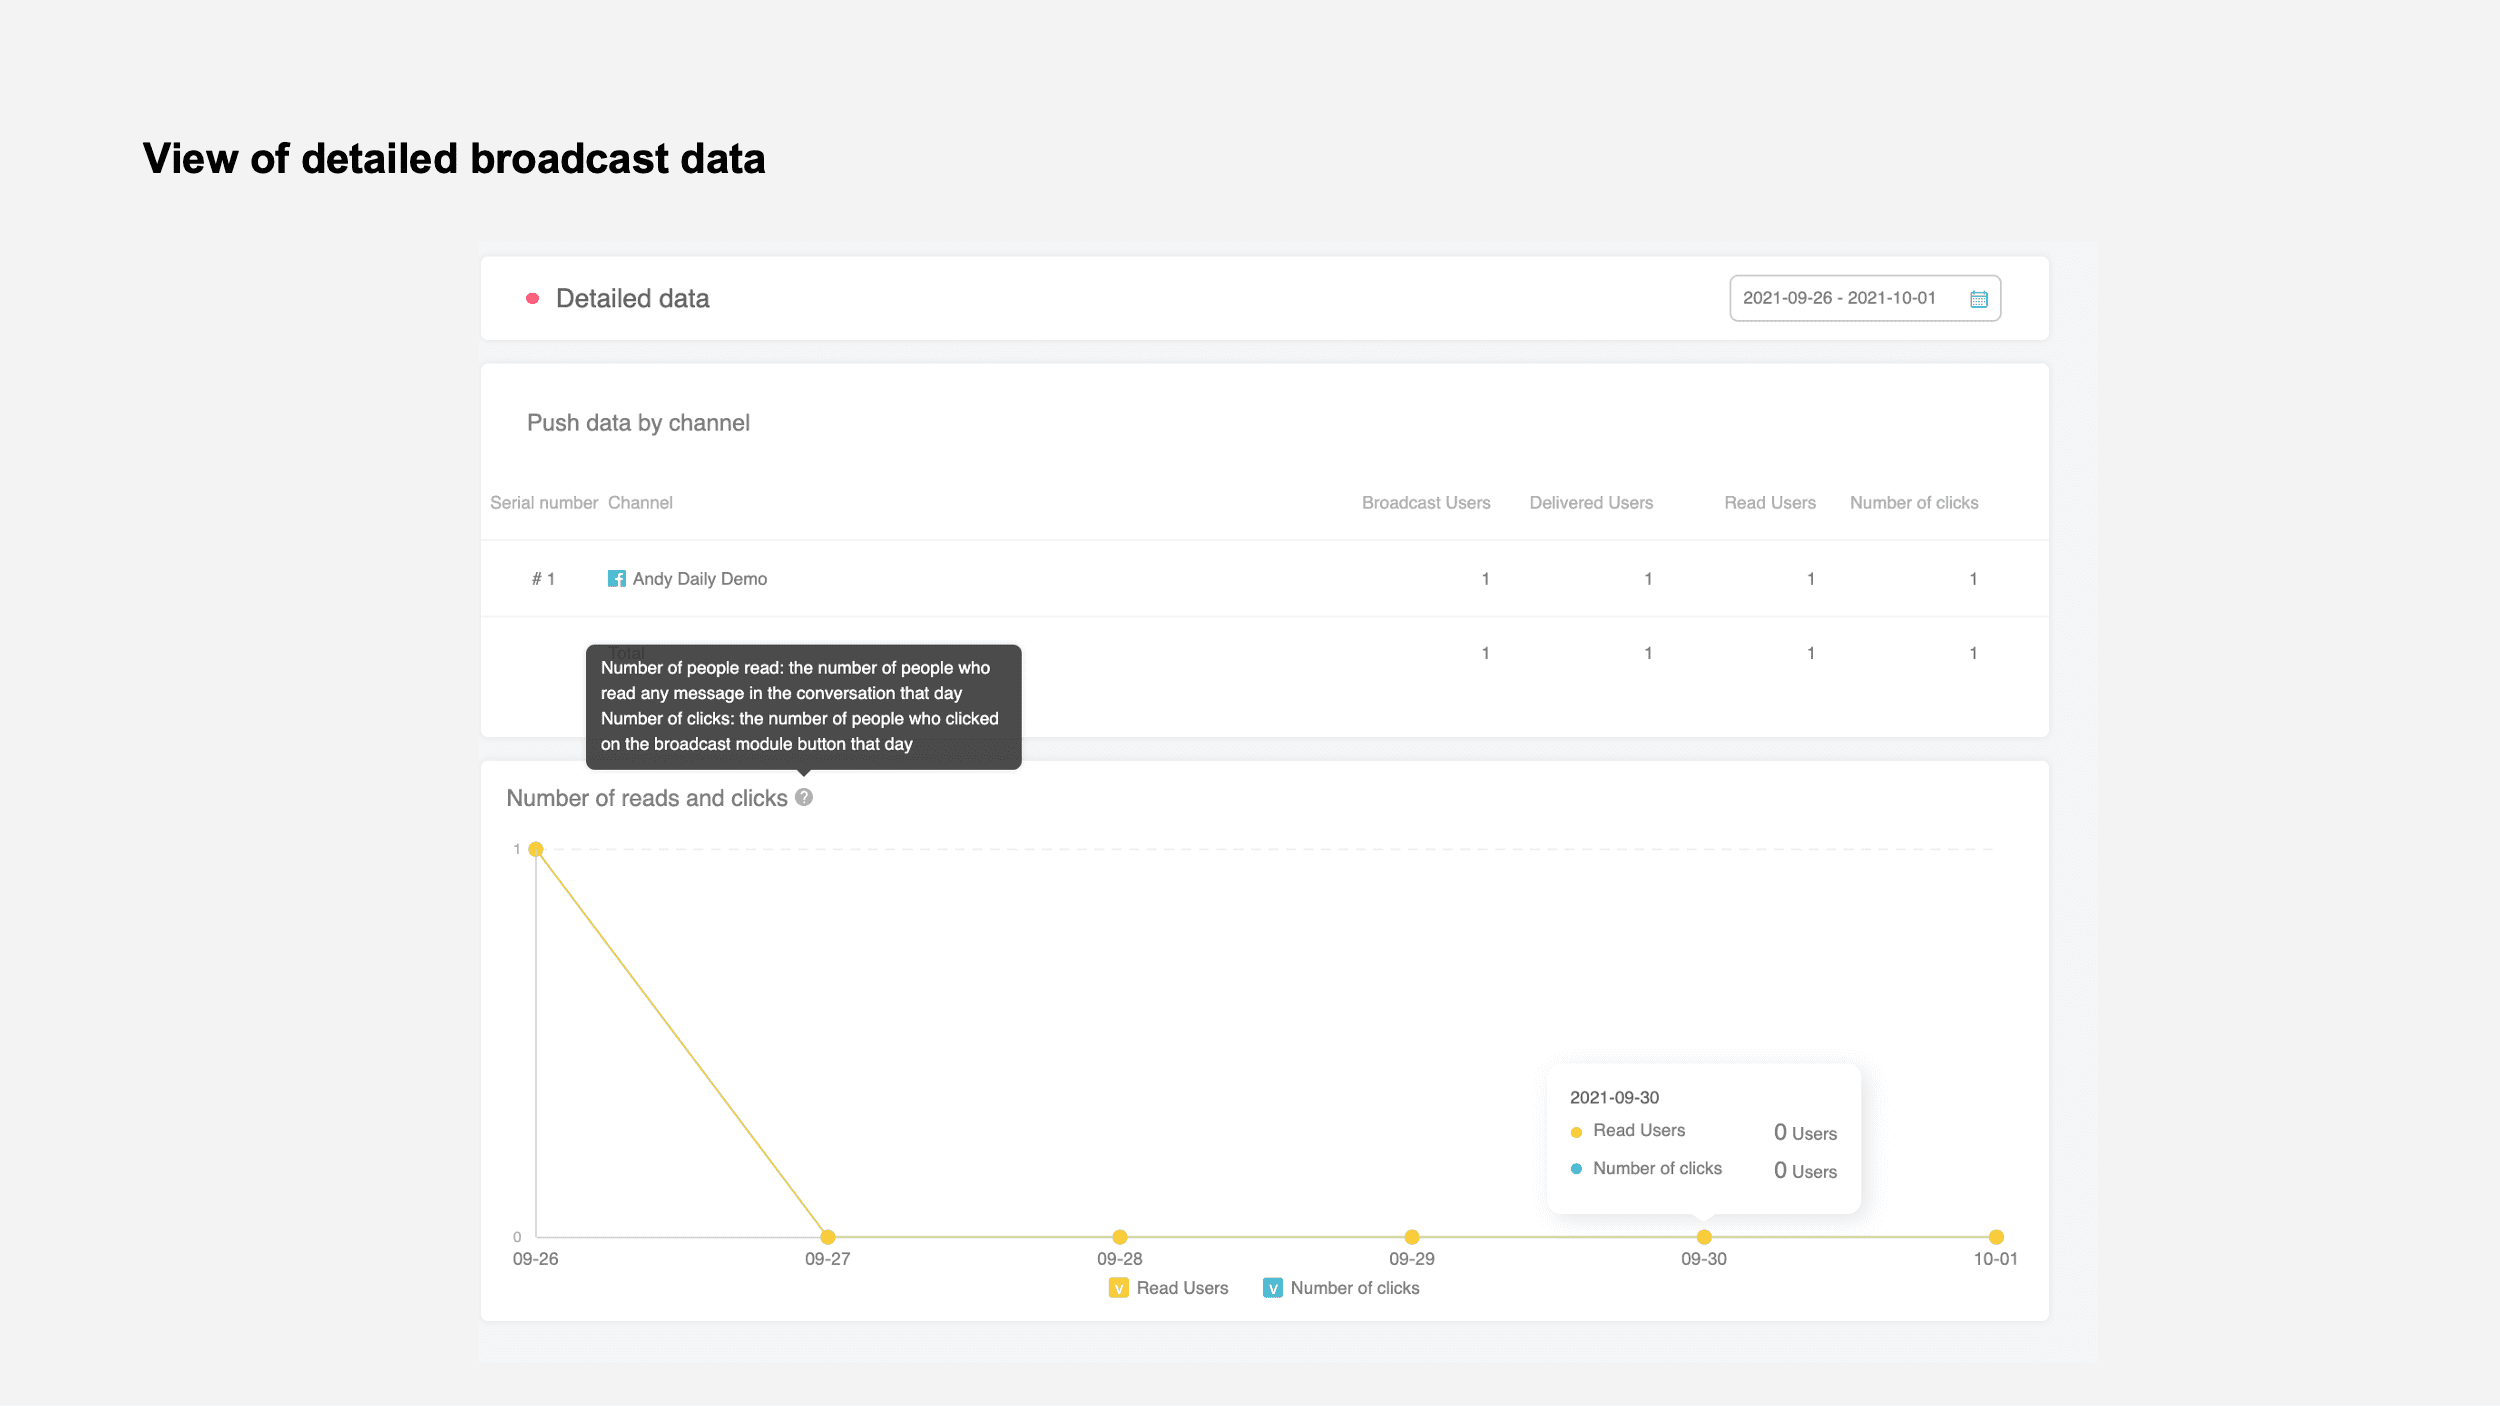
7. Broadcast performance report
Go to “Push Notification” on the left menu to see the following screen. There, you can see the record of past messages in the “Sent Broadcasts” section at the bottom of the screen. Click the “eye icon” on the right to view the report. Broadcasts will only be generated 5 minutes after successfully sent; the data will be updated continuously.

View the following four types of broadcast effectiveness by using the Broadcast function: The number of recipients, Delivered Users, Read Users, and Number of Clicks. At the same time, you can also view the user’s click interaction rate in this Broadcast in more depth. The system can track click interactions in the following message formats:
- Text Message/Carousel Card Button: Response module, open URL
- Quick Reply: Response module (send location not counted)
- Imagemap button: Response module, open URL

You can view the broadcast data of the specified section. The system will calculate the Read Users and Number of Clicks based on the unique number of people. The Read Users represents the unique number of people who have read any message in the conversation on that day. The number of clicks refers to the unique number of button presses for the Broadcast Module.
【BotBonnie’s Note】The reason for the failure of delivery may be that the user has actively blocked it or that the user no longer exists, or you may have violated Facebook’s 24-hour policy. For details on the restrictions, see >>2020 Facebook 24-hour policy
Pay extra attention:
- 1. If you use LINE to send “Broadcasts,” the “Read Users” in the report will be displayed as –, because the system cannot fetch data of Read Users from the LINE platform.
- 1. If you use LINE and select “Mass Broadcasts,” you will not be able to view the Broadcast report, because the system cannot fetch all the official account friends’ data from the LINE platform.
Congratulations! You can now start remarketing to users!
