More businesses on social media have begun expanding their reach on Instagram and new social media. Businesses can use attractive images to demonstrate product characteristics and make use of the most popular social media for Generation Z. We have discussed how to use Post Comment Reply to help increase the number of fans for brand accounts. Now, we will discuss how to use a chatbot to create a 24/7 private message auto reply to help you increase the number of fans and increase customer service satisfaction rate.
👉 Try using a chatbot — the trendy secret weapon for increasing the number of fans on Instagram
Create a 24/7 Customer Service Center with Smart Reply for Keyword
BotBonnie chatbot provides “AI Rules” to help brands set frequently asked questions so that when fans send private messages with specific keywords, they can trigger the bot to respond with preset module messages. Customer service representatives are no longer required to manually respond to inquiries one at a time. Use the BotBonnie chatbot for the first level of private message screening. In addition, you can also respond to personalized requests by automatically assigning a customer service representative to help fans with their inquiries on purchase orders, courses, and other scenarios that require customer service representatives.
Now, let’s set AI Rules together! Before proceeding to the settings, please make sure that you have bound the Instagram business account to the BotBonnie console!
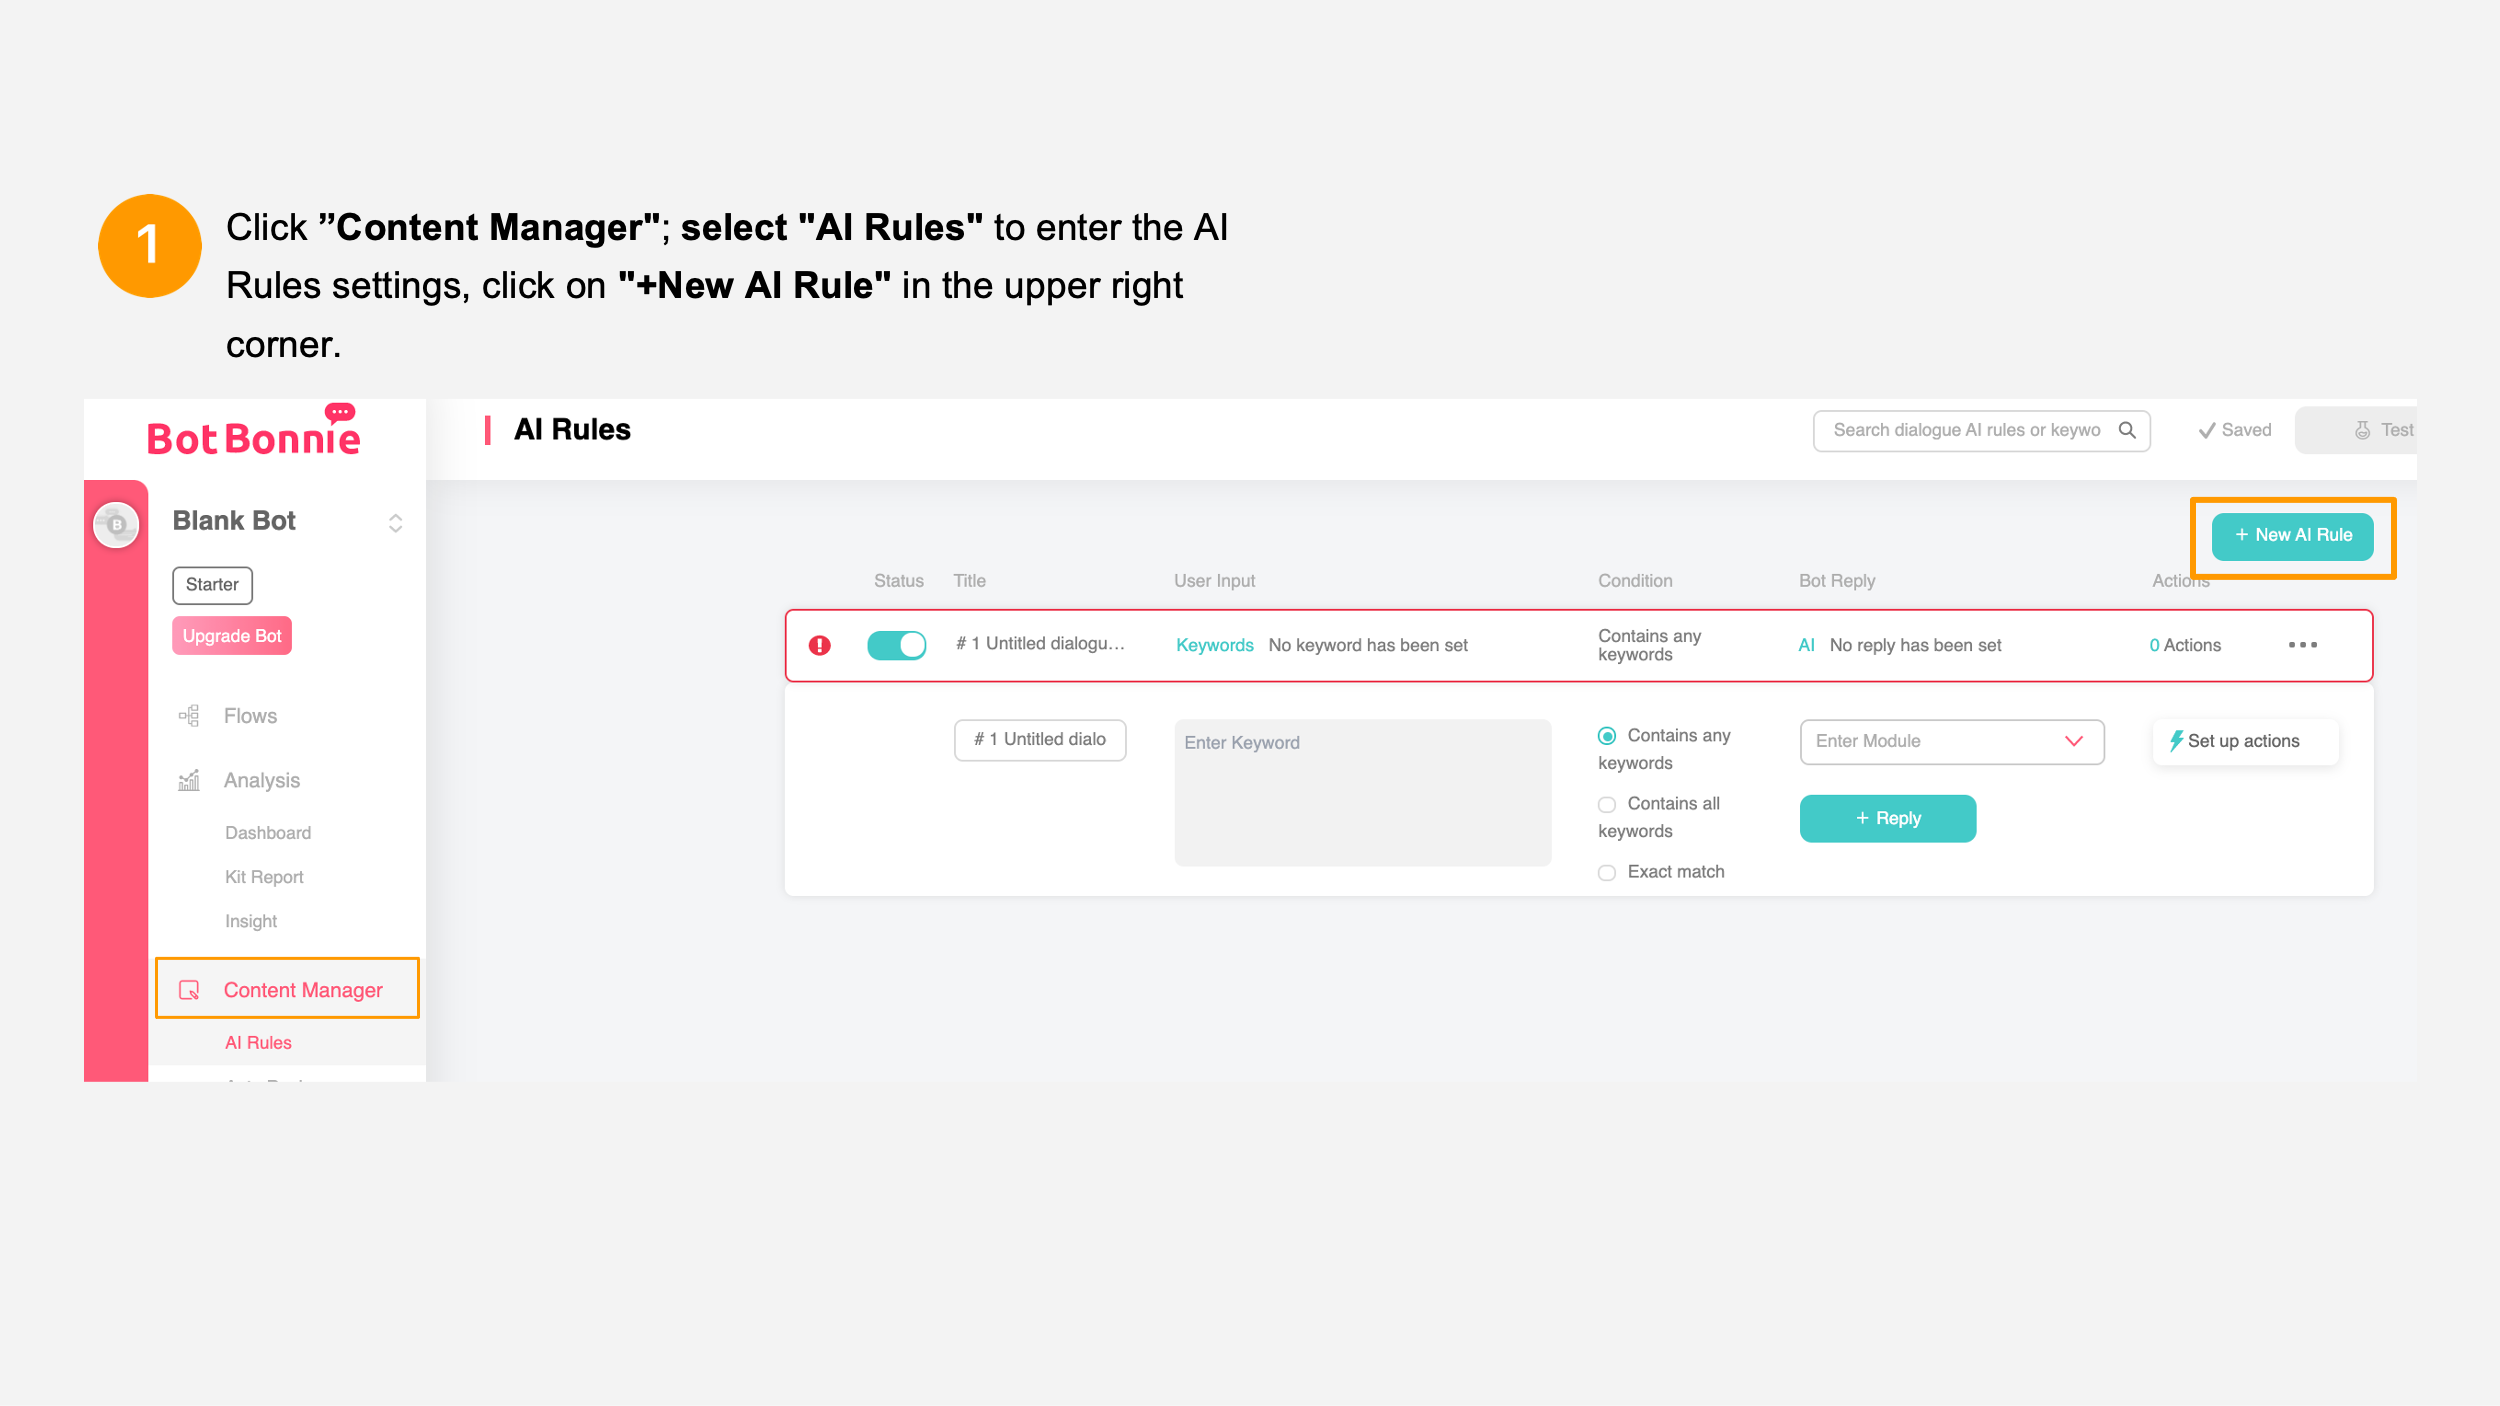
AI Rules Settings
New AI Rule
First, go to the menu to the left of the bot platform and click “Content Manager”; select “AI Rules” to enter the AI Rules settings screen, click on “+New AI Rule” in the upper right corner, and the addition is complete!
Add Keywords
Click on the AI Rules you just added to expand the editor bar and set keywords. Set words frequently used by fans in private messages as trigger keywords. You must press enter after entering each keyword to complete the settings.
Name certain keywords so that when you have multiple AI Rules columns, you can simply use the search bar at the top to enter the name of the AI Rules for quick tracking. If you need to cancel the use of the dialogue module, just switch the cyan button on the left to the off position.
Next, select the conditions for the AI Rules: Contains any keywords/Contains all keywords/Exact match.
Settings for Conditions in AI Rules
When you enter “replacement” or “sample” as keywords, the comments that can be used as triggers are as follows:
- Contains any keywords: The comment must include keywords and other text are permitted. Example: “I want a replacement” and “Can I get a sample?”
- Contains all keywords: The comment must contain all specified keywords. Example: “I want to ask about replacement and sample services.”
- Exact match: he comment must be completely identical to one set of keywords and the text must be exactly the same: “replacement” and “sample.”

【Bonnie’s Note】Keyword settings distinguish between halfwidth and fullwidth forms but do not distinguish between letter cases.
Select Bot Reply Module
After setting the designated keywords, you need to select the Message module to which the bot will reply when the user enters the keywords. You can search by typing or just select the message module from the dropdown menu. The “replacement and return inquiries” module is used as a sample in the figure above. Once you have selected a message module, you can click on the module preview below to view the message contents.
【Bonnie’s Note】Before setting the message module for replying, you must “Deploy” the bot before you can see the dialogue module from the dropdown menu
Set up Actions
When a user enters a keyword, it means that the user is interested in that word. Therefore, we can add an “Action” to that keyword, so that the user will be tagged upon entering the keyword; or the user will be automatically transferred to a customer service representative, or redirected to different menus and other applications. Just click the lightning bolt icon to start Actions. You can choose to use “Add Tag, Remove Tag, Notify Customer Care, Set Menu Group, and HTTP Request.”
After setting the AI Rules, remember to click “Deploy” at the top right corner so that fans can trigger keywords and resolve many common issues.

Increase customer service quality with advanced applications of private messages on Instagram
Resolve fan requirements instantly with human-machine transfers and zero missed messages
BotBonnie chatbot provides 24/7 uninterrupted services with smooth human-machine transfer procedures for the customer service team to work closely with bots. It helps fans find a customer service representative with ease and satisfy their personal requirements. Let’s set up the human-machine transfer procedures.
Set Notify Agent
First, ask customer service representatives and the editor to add LINE Notify as a friend. Then, click “Settings” in the menu on the left to switch to the “Notify Agent” page. Click the “+LINE Notify” at the top right corner to link the bot to LINE Notify.
You can see on the screen that there are two friends types: users and groups. If you choose a personal LINE account when connected to LINE Notify, it will be a “user”; if you choose a certain line Group, it will be a “group.” Both types can be used as notification channels.
【Bonnie’s Tip】When a fan triggers the Notify Customer Care function, LINE Notify can connect the message to your personal LINE account and remind you to check customer service messages.

Design Customer Service Representative Transfer Procedures
To facilitate human-machine transfers, you must set a button for transferring the dialogue to a customer service representative in the dialogue procedures. You must select “Notify Customer Care” when setting “Actions” so that when fans click the button, it will trigger LINE Notify and actively notify the customer service representative to respond to messages from the Live Chat console.
Next, set the default response of the bot to fans and private messages. Add a module for “Notification complete.” Once the user enters a message, the user will receive the message informing the user that a dedicated representative has been notified to process the issue. It helps customer service representatives resolve the anxiety of the fans.
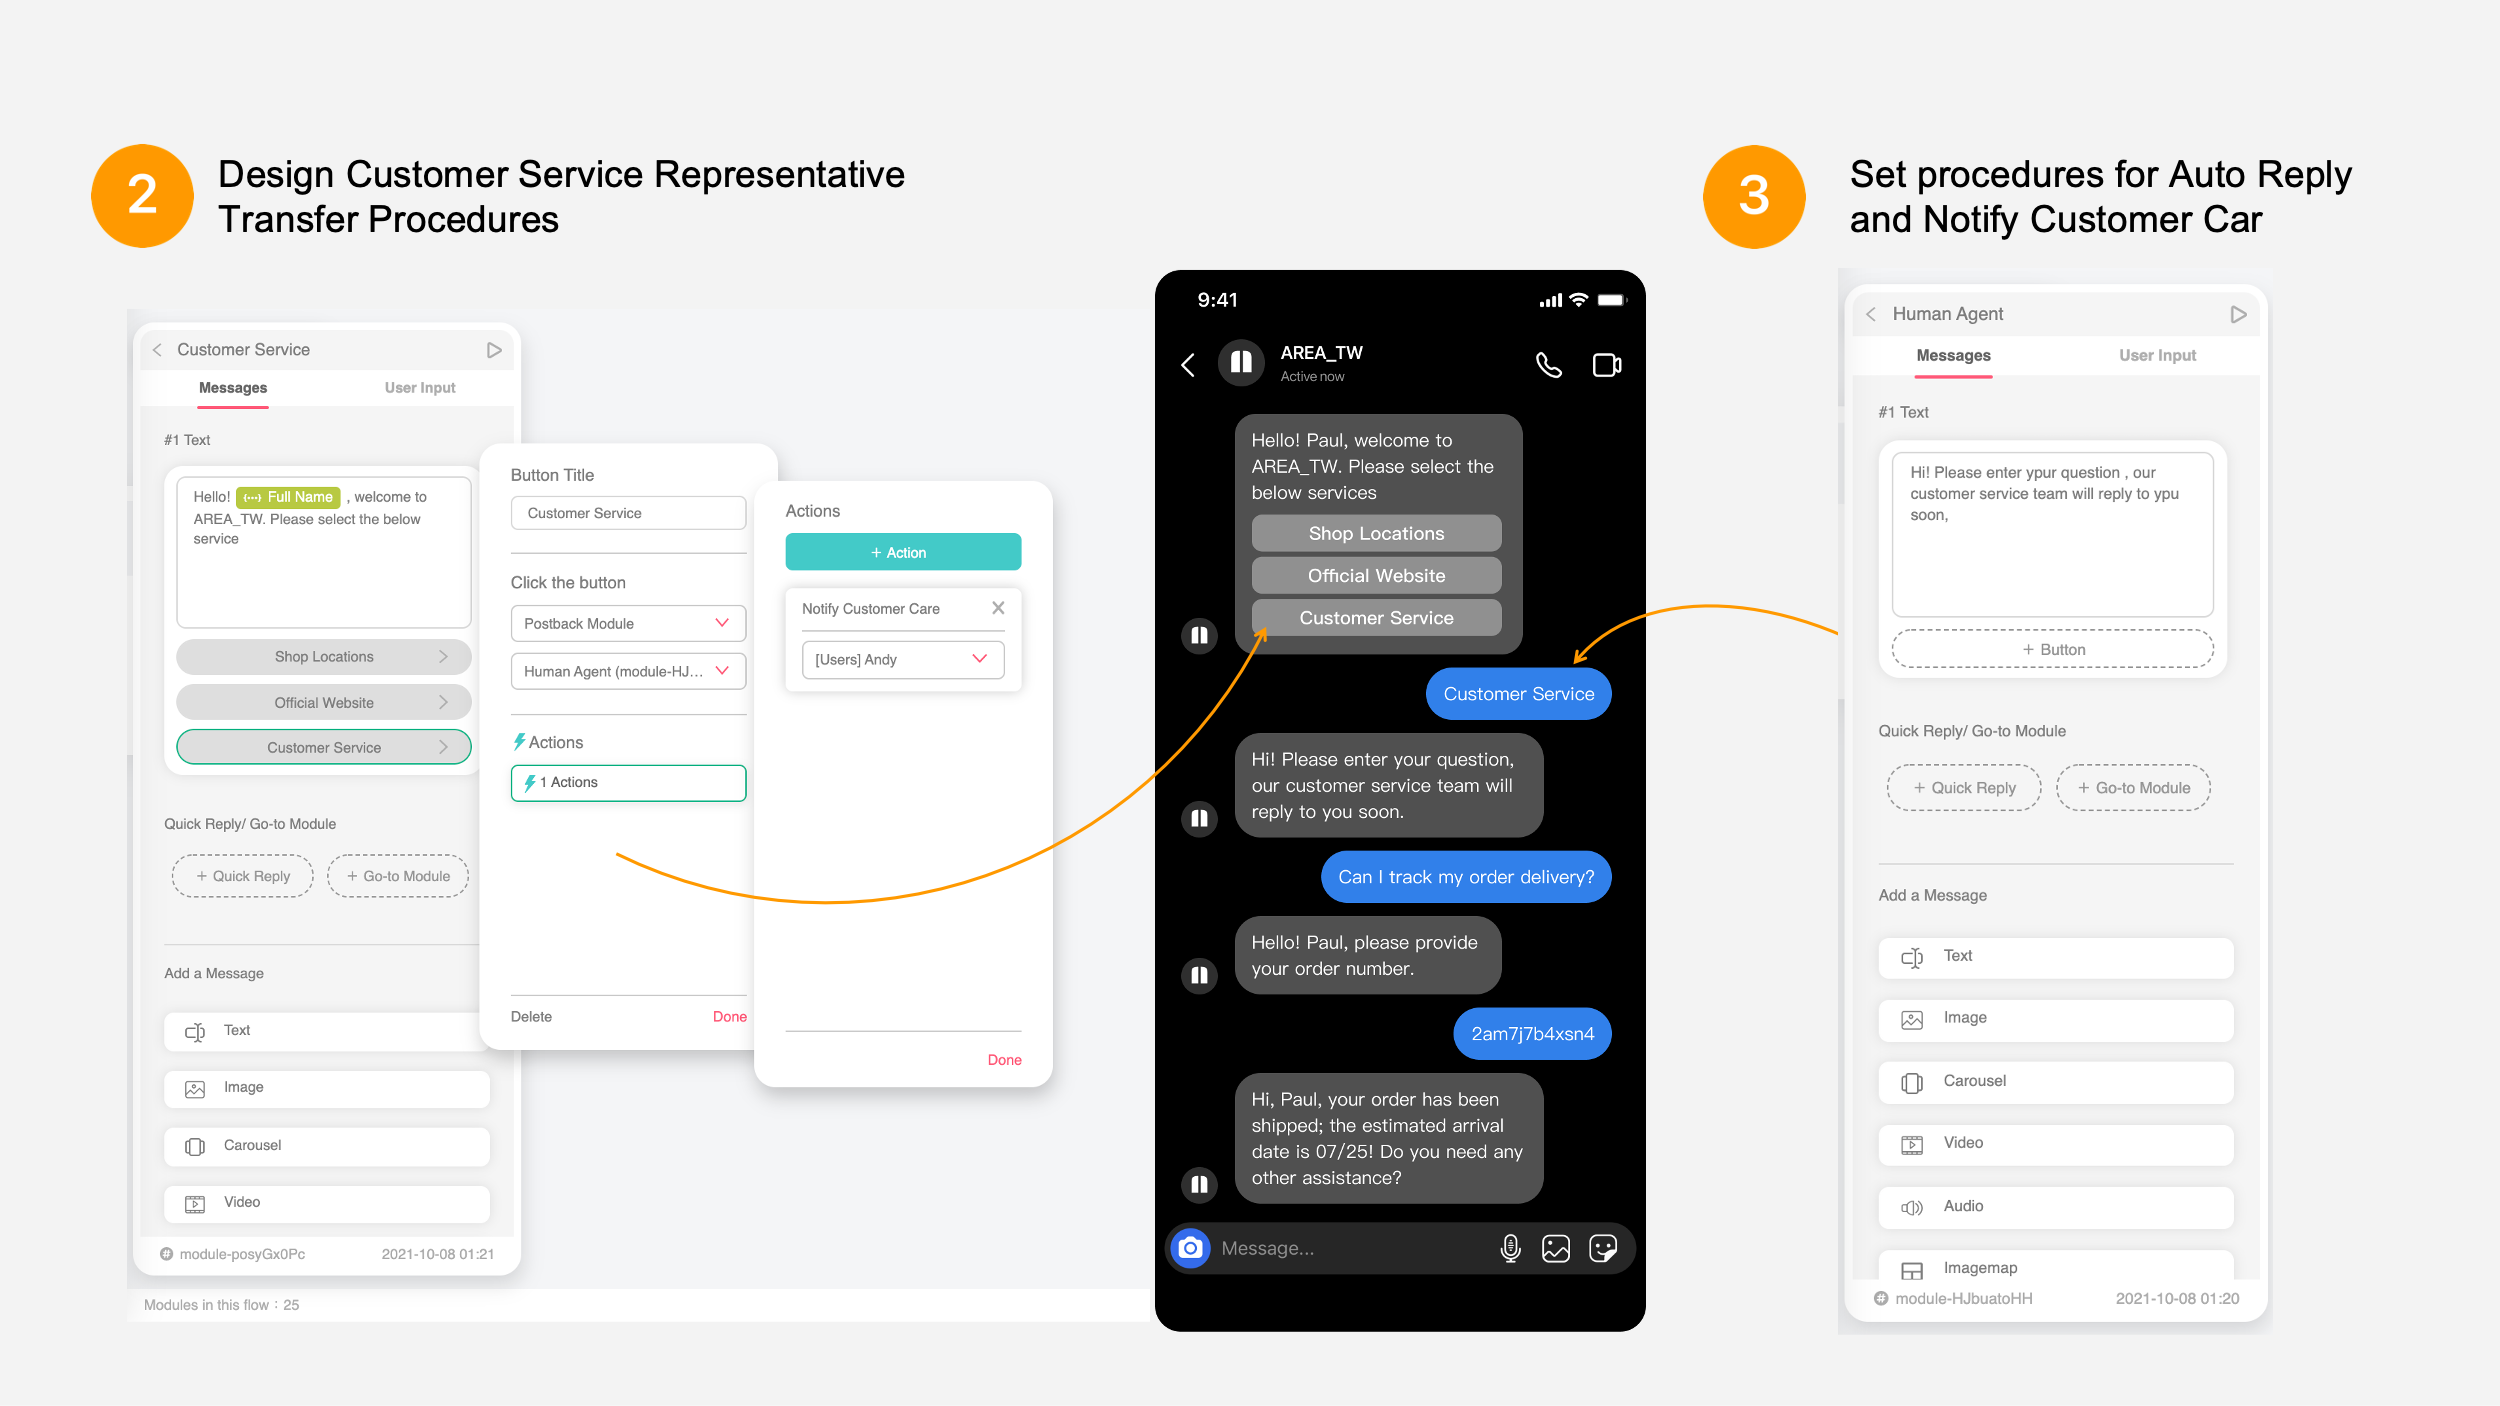
👉 Create human-machine transfer procedures with three simple steps
Set Auto Reply and improve the Notify Customer Care procedures
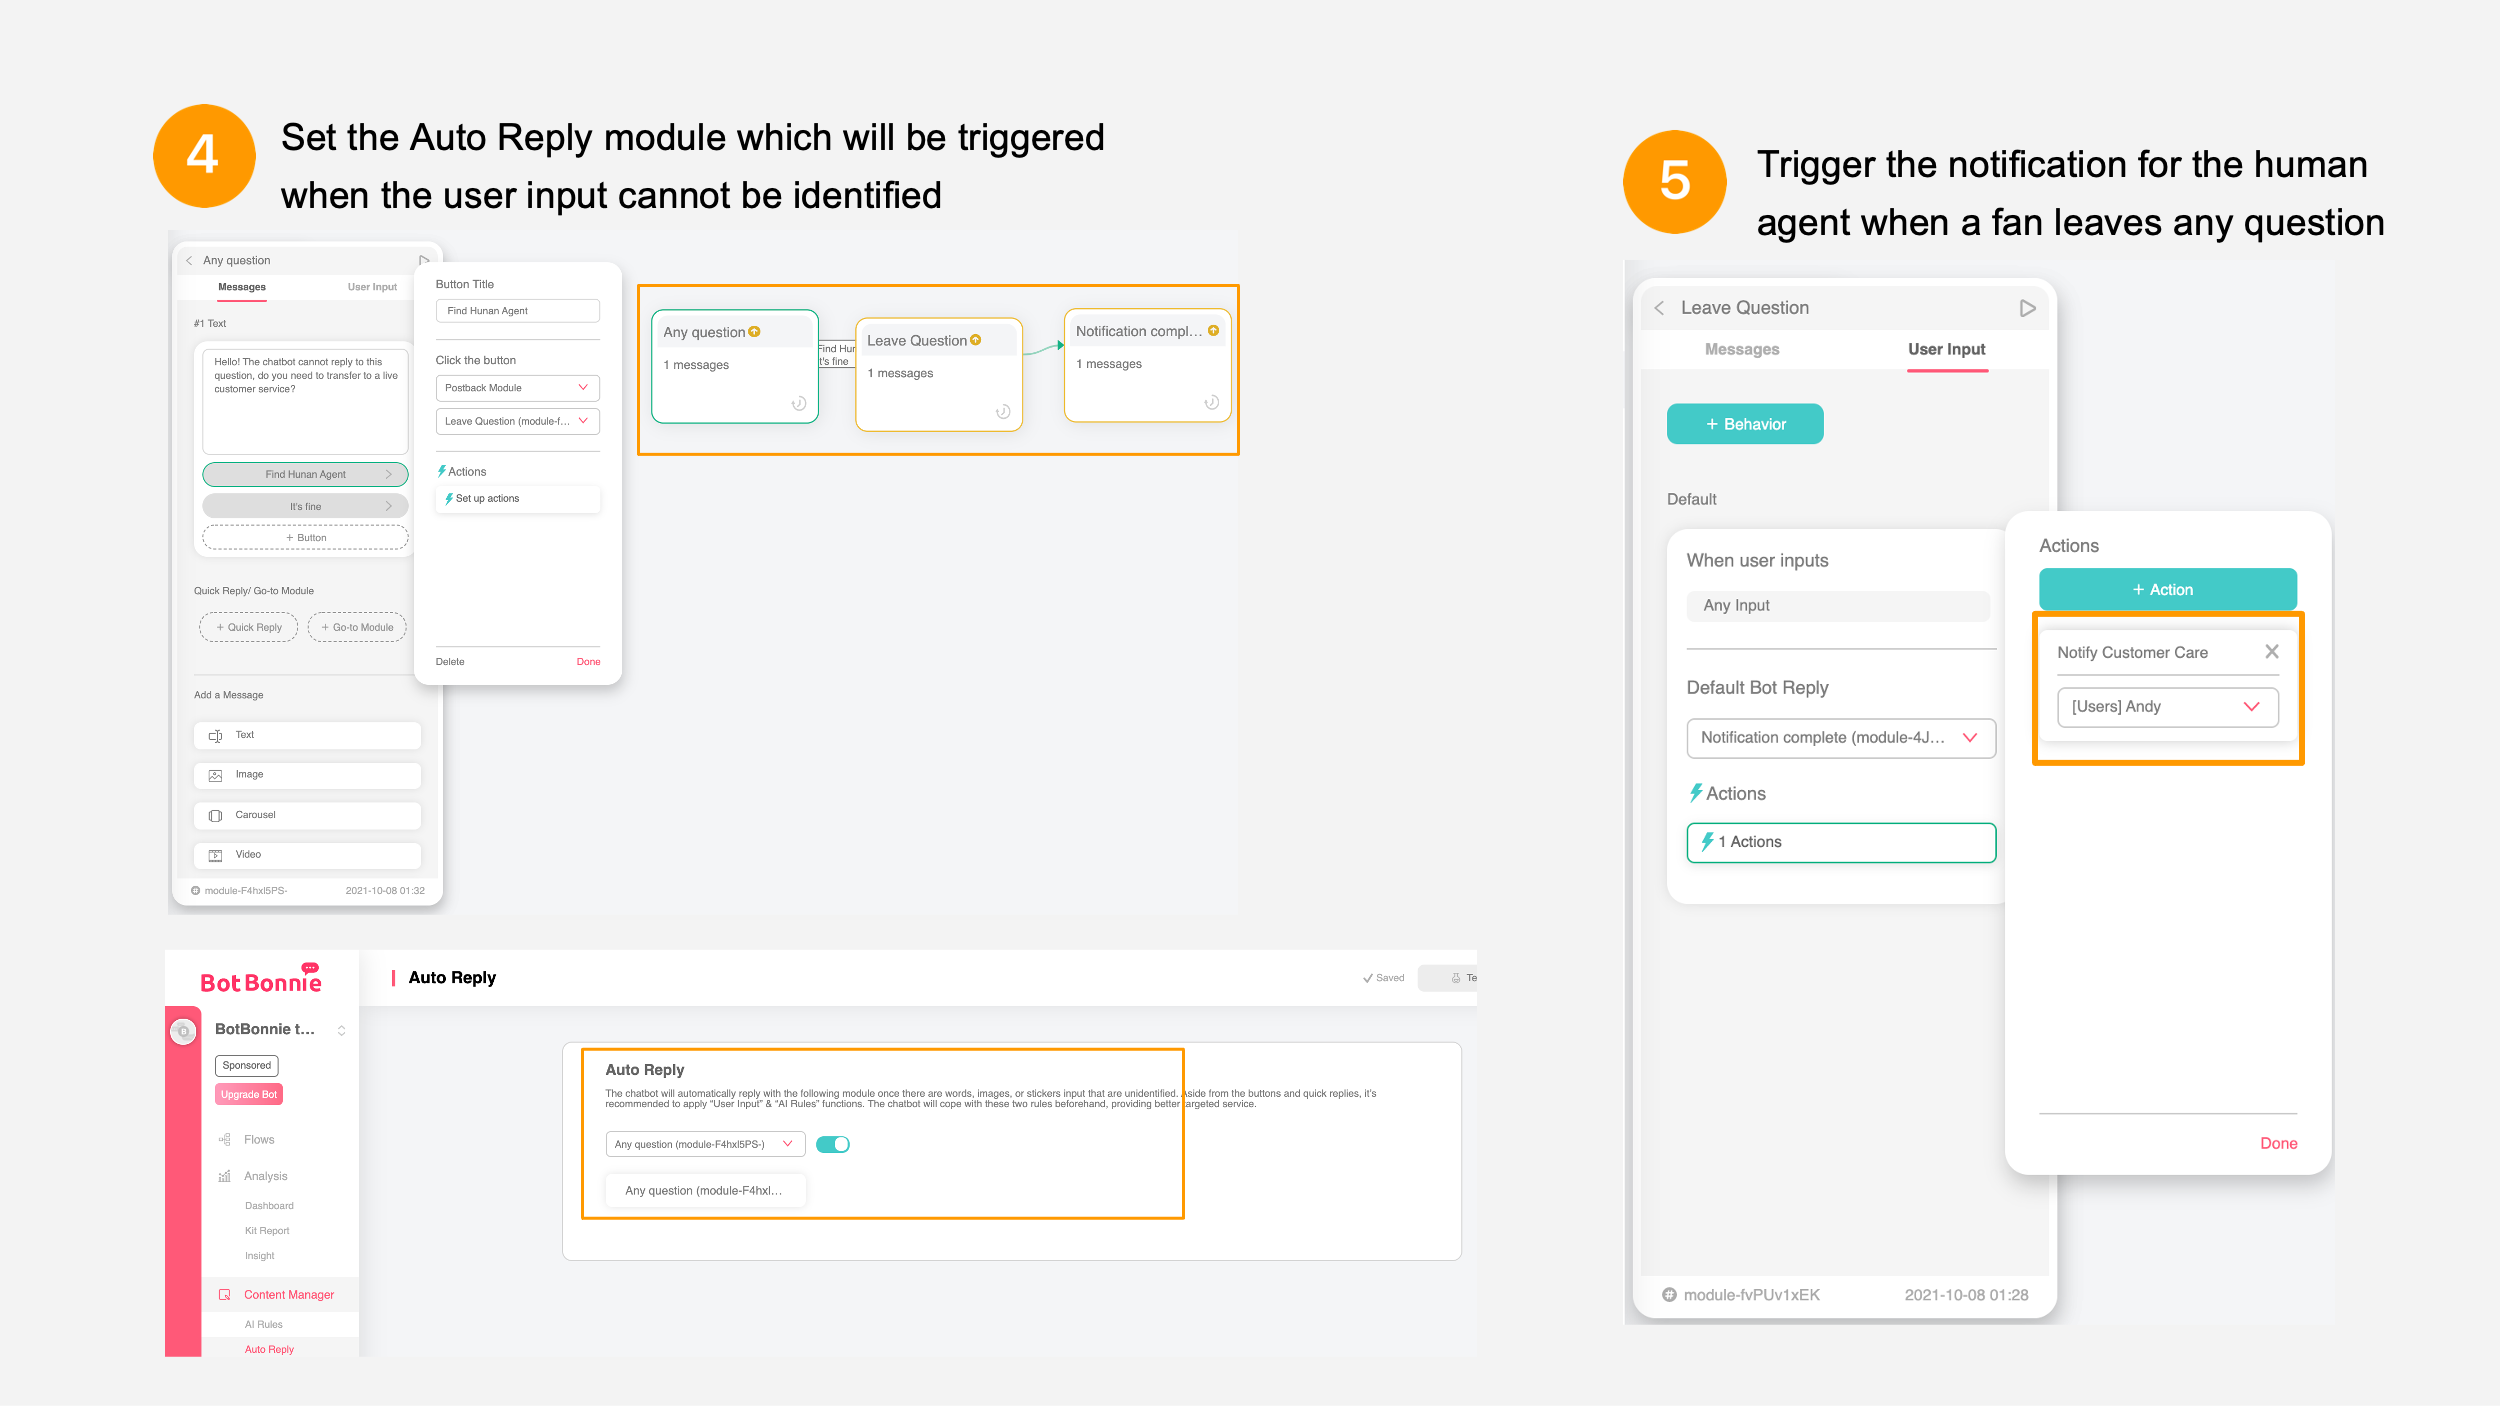
If the user has a question in the dialogue process, the user may enter related questions directly by typing. If the question is not included in the keywords of AI Rules, the bot cannot identify the question and provide a response. You can use Auto Reply to guide users through the Notify Customer Care process. Now, let’s design the Auto Reply procedures and deal with this issue.
First, create three dialogue modules and form Auto Reply dialogue procedures.
- Any entry module: This module appears when a fan enters a message that cannot be identified. Design two buttons for the fan to confirm whether he/she intends to contact a customer service representative or the editor (if the fan does not need to contact the editor, you can design a button that redirects the fan to the main menu or the FAQ module).
- Leave question module: When the fan clicks on “Yes” and confirms his/her intent to contact the editor, the module directs the fan to leave a question and adds the triggered action “Notify Customer Care” to contact a customer service representative.
- Notification complete: This is the response from the module after a fan sends a question. It informs the user that the request has been received and a response will be provided as quickly as possible.
After setting a series of Auto Reply modules, click “Auto Reply” in “Automation” in the menu on the left and select “any entry” module you just set. The bot would understand that when a fan enters a message that cannot be identified, it will display the “any entry” module to help the fan with follow-up actions.
This way, when the message entered by the user does not contain the keywords set in AI Rules, it will automatically guide the user to the process for summoning the editor.
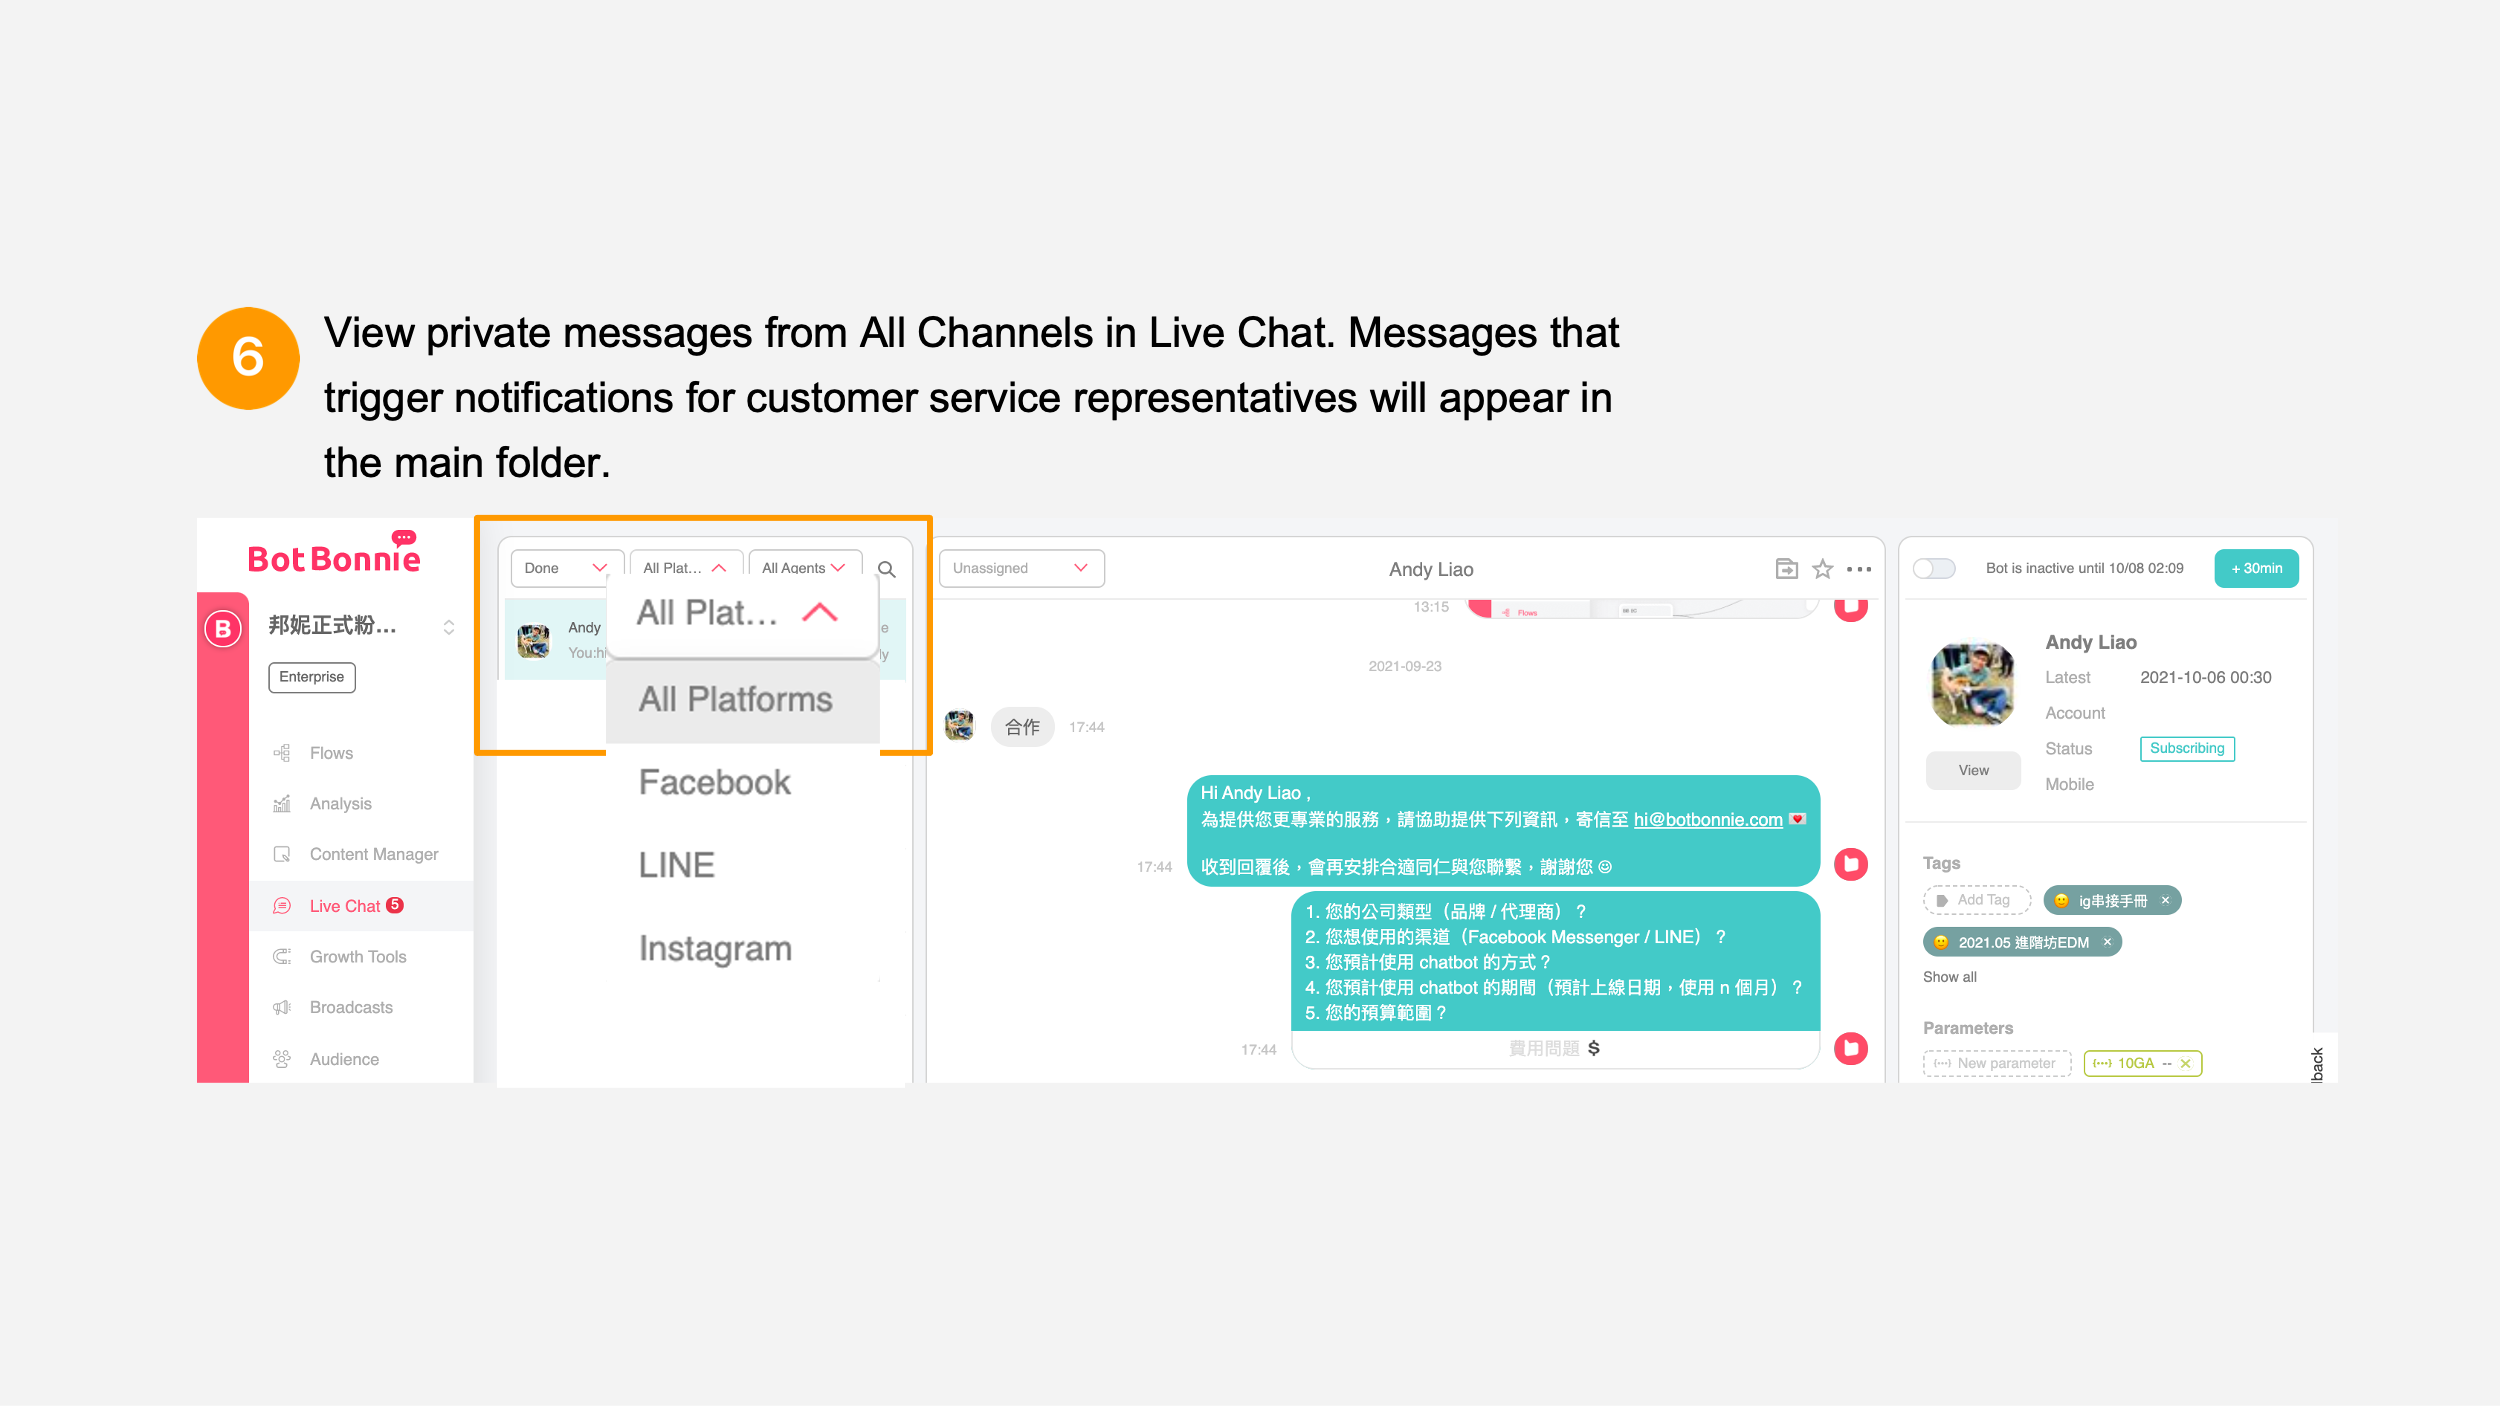
One console for managing messages for all channels
When the notification for the customer service representative is triggered, customer service representatives can use LINE Notify to actively receive information. It reminds customer service representatives to return to the BotBonnie bot console and respond to the private message. You can view and respond to all user messages across all platforms (Instagram, LINE, and Facebook) in “Live Chat” in the menu on the left.
In addition to responding to fan messages in the console, BotBonnie also provides a built-in browser live chat function that allows customer service representatives to respond to private messages at any time from anywhere.
👉Let’s learn more about Live Chat functions!
Comprehensive Instagram service center with upgraded private message management
Use BotBonnie AI Rules to resolve vast amounts of frequently asked questions from fans. Use the Notify Customer Care function to help fans find customer service representatives with ease. We provide abundant message formats in the dialogue process such as text, button, image, carousel, and delay messages so that fans can obtain comprehensive product information and event information on Instagram. It helps brands effectively communicate information and increase brand value.

Use the Instagram chatbot to help you resolve private message issues on Instagram, save vast amounts of time for customer service representatives, and effectively manage your Instagram business account. Create a smooth process for finding customer service personnel and reduce the fan bounce rate. Keep fans on your Instagram business account and create greater business returns.